
AutoMM Detection - Fast Finetune on COCO Format Dataset
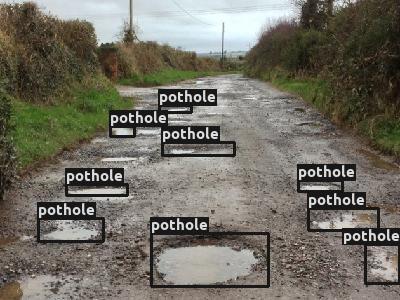
Fig. 2 Pothole Dataset
In this section, our goal is to fast finetune and evaluate a pretrained
model on Pothole
dataset
in COCO format. Pothole is a single object, i.e. pothole,
detection dataset, containing 665 images with bounding box annotations
for the creation of detection models and can work as POC/POV for the
maintenance of roads. See AutoMM Detection - Prepare Pothole Dataset
for how to prepare Pothole dataset.
To start, let’s import MultiModalPredictor:
from autogluon.multimodal import MultiModalPredictor
Make sure mmcv-full and mmdet are installed:
!mim install mmcv-full
!pip install mmdet
Looking in links: https://download.openmmlab.com/mmcv/dist/cu117/torch1.13.0/index.html
Requirement already satisfied: mmcv-full in /home/ci/opt/venv/lib/python3.8/site-packages (1.7.1)
Requirement already satisfied: Pillow in /home/ci/opt/venv/lib/python3.8/site-packages (from mmcv-full) (9.4.0)
Requirement already satisfied: packaging in /home/ci/opt/venv/lib/python3.8/site-packages (from mmcv-full) (23.0)
Requirement already satisfied: numpy in /home/ci/opt/venv/lib/python3.8/site-packages (from mmcv-full) (1.23.5)
Requirement already satisfied: pyyaml in /home/ci/opt/venv/lib/python3.8/site-packages (from mmcv-full) (5.4.1)
Requirement already satisfied: yapf in /home/ci/opt/venv/lib/python3.8/site-packages (from mmcv-full) (0.32.0)
Requirement already satisfied: addict in /home/ci/opt/venv/lib/python3.8/site-packages (from mmcv-full) (2.4.0)
Requirement already satisfied: opencv-python>=3 in /home/ci/opt/venv/lib/python3.8/site-packages (from mmcv-full) (4.7.0.72)
Requirement already satisfied: mmdet in /home/ci/opt/venv/lib/python3.8/site-packages (2.28.1)
Requirement already satisfied: pycocotools in /home/ci/opt/venv/lib/python3.8/site-packages (from mmdet) (2.0.6)
Requirement already satisfied: matplotlib in /home/ci/opt/venv/lib/python3.8/site-packages (from mmdet) (3.6.3)
Requirement already satisfied: terminaltables in /home/ci/opt/venv/lib/python3.8/site-packages (from mmdet) (3.1.10)
Requirement already satisfied: six in /home/ci/opt/venv/lib/python3.8/site-packages (from mmdet) (1.16.0)
Requirement already satisfied: numpy in /home/ci/opt/venv/lib/python3.8/site-packages (from mmdet) (1.23.5)
Requirement already satisfied: scipy in /home/ci/opt/venv/lib/python3.8/site-packages (from mmdet) (1.10.1)
Requirement already satisfied: kiwisolver>=1.0.1 in /home/ci/opt/venv/lib/python3.8/site-packages (from matplotlib->mmdet) (1.4.4)
Requirement already satisfied: packaging>=20.0 in /home/ci/opt/venv/lib/python3.8/site-packages (from matplotlib->mmdet) (23.0)
Requirement already satisfied: python-dateutil>=2.7 in /home/ci/opt/venv/lib/python3.8/site-packages (from matplotlib->mmdet) (2.8.2)
Requirement already satisfied: pillow>=6.2.0 in /home/ci/opt/venv/lib/python3.8/site-packages (from matplotlib->mmdet) (9.4.0)
Requirement already satisfied: contourpy>=1.0.1 in /home/ci/opt/venv/lib/python3.8/site-packages (from matplotlib->mmdet) (1.0.7)
Requirement already satisfied: pyparsing>=2.2.1 in /home/ci/opt/venv/lib/python3.8/site-packages (from matplotlib->mmdet) (3.0.9)
Requirement already satisfied: fonttools>=4.22.0 in /home/ci/opt/venv/lib/python3.8/site-packages (from matplotlib->mmdet) (4.38.0)
Requirement already satisfied: cycler>=0.10 in /home/ci/opt/venv/lib/python3.8/site-packages (from matplotlib->mmdet) (0.11.0)
And also import some other packages that will be used in this tutorial:
import os
import time

from autogluon.core.utils.loaders import load_zip
We have the sample dataset ready in the cloud. Let’s download it:
zip_file = "https://automl-mm-bench.s3.amazonaws.com/object_detection/dataset/pothole.zip"
download_dir = "./pothole"

load_zip.unzip(zip_file, unzip_dir=download_dir)
data_dir = os.path.join(download_dir, "pothole")
train_path = os.path.join(data_dir, "Annotations", "usersplit_train_cocoformat.json")
val_path = os.path.join(data_dir, "Annotations", "usersplit_val_cocoformat.json")
test_path = os.path.join(data_dir, "Annotations", "usersplit_test_cocoformat.json")
Downloading ./pothole/file.zip from https://automl-mm-bench.s3.amazonaws.com/object_detection/dataset/pothole.zip...
100%|██████████| 351M/351M [00:06<00:00, 54.2MiB/s]
While using COCO format dataset, the input is the json annotation file
of the dataset split. In this example,
usersplit_train_cocoformat.json is the annotation file of the train
split. usersplit_val_cocoformat.json is the annotation file of the
validation split. And usersplit_test_cocoformat.json is the
annotation file of the test split.
We select the YOLOX-small model pretrained on COCO dataset. With this
setting, it is fast to finetune or inference, and easy to deploy. Note
that you can use a YOLOX-large by setting the checkpoint_name to
"yolox_l_8x8_300e_coco" for better performance (but slower speed).
Note that you may need to change the learning_rate and
per_gpu_batch_size for a different model. An easier way is to use our
predefined presets "medium_quality", "high_quality", or
"best_quality". For more about using presets, see
AutoMM Detection - Quick Start on a Tiny COCO Format Dataset. And we use all the GPUs
(if any):
checkpoint_name = "yolox_s_8x8_300e_coco"
num_gpus = -1  # use all GPUs
We create the MultiModalPredictor with selected checkpoint name and
number of GPUs. We need to specify the problem_type to
"object_detection", and also provide a sample_data_path for the
predictor to infer the categories of the dataset. Here we provide the
train_path, and it also works using any other split of this dataset.
predictor = MultiModalPredictor(
    hyperparameters={
        "model.mmdet_image.checkpoint_name": checkpoint_name,
        "env.num_gpus": num_gpus,
    },
    problem_type="object_detection",
    sample_data_path=train_path,
)
Downloading yolox_s_8x8_300e_coco_20211121_095711-4592a793.pth from https://download.openmmlab.com/mmdetection/v2.0/yolox/yolox_s_8x8_300e_coco/yolox_s_8x8_300e_coco_20211121_095711-4592a793.pth...
load checkpoint from local path: yolox_s_8x8_300e_coco_20211121_095711-4592a793.pth
The model and loaded state dict do not match exactly

size mismatch for bbox_head.multi_level_conv_cls.0.weight: copying a param with shape torch.Size([80, 128, 1, 1]) from checkpoint, the shape in current model is torch.Size([1, 128, 1, 1]).
size mismatch for bbox_head.multi_level_conv_cls.0.bias: copying a param with shape torch.Size([80]) from checkpoint, the shape in current model is torch.Size([1]).
size mismatch for bbox_head.multi_level_conv_cls.1.weight: copying a param with shape torch.Size([80, 128, 1, 1]) from checkpoint, the shape in current model is torch.Size([1, 128, 1, 1]).
size mismatch for bbox_head.multi_level_conv_cls.1.bias: copying a param with shape torch.Size([80]) from checkpoint, the shape in current model is torch.Size([1]).
size mismatch for bbox_head.multi_level_conv_cls.2.weight: copying a param with shape torch.Size([80, 128, 1, 1]) from checkpoint, the shape in current model is torch.Size([1, 128, 1, 1]).
size mismatch for bbox_head.multi_level_conv_cls.2.bias: copying a param with shape torch.Size([80]) from checkpoint, the shape in current model is torch.Size([1]).
We set the learning rate to be 1e-4. Note that we use a two-stage
learning rate option during finetuning by default, and the model head
will have 100x learning rate. Using a two-stage learning rate with high
learning rate only on head layers makes the model converge faster during
finetuning. It usually gives better performance as well, especially on
small datasets with hundreds or thousands of images. We set batch size
to be 16, and you can increase or decrease the batch size based on your
available GPU memory. We set max number of epochs to 30, number of
validation check per interval to 1.0, and validation check per n epochs
to 3 for fast finetuning. We also compute the time of the fit process
here for better understanding the speed.
import time
start = time.time()
predictor.fit(
    train_path,
    tuning_data=val_path,
    hyperparameters={
        "optimization.learning_rate": 1e-4,  # we use two stage and detection head has 100x lr
        "env.per_gpu_batch_size": 16,  # decrease it when model is large
        "optimization.max_epochs": 30,  # max number of training epochs, note that we may early stop before this based on validation setting
        "optimization.val_check_interval": 1.0,  # Do 1 validation each epoch
        "optimization.check_val_every_n_epoch": 3,  # Do 1 validation each 3 epochs
        "optimization.patience": 3,  # Early stop after 3 consective validations are not the best
    },
)
end = time.time()
Using default root folder: ./pothole/pothole/Annotations/... Specify root=... if you feel it is wrong...
Using default root folder: ./pothole/pothole/Annotations/... Specify root=... if you feel it is wrong...
Global seed set to 123
No path specified. Models will be saved in: "AutogluonModels/ag-20230222_231951/"
loading annotations into memory...
Done (t=0.00s)
creating index...
index created!
loading annotations into memory...
Done (t=0.00s)
creating index...
index created!
AutoMM starts to create your model. ✨

- Model will be saved to "/home/ci/autogluon/docs/_build/eval/tutorials/multimodal/object_detection/finetune/AutogluonModels/ag-20230222_231951".

- Validation metric is "map".

- To track the learning progress, you can open a terminal and launch Tensorboard:
    `shell
    # Assume you have installed tensorboard
    tensorboard --logdir /home/ci/autogluon/docs/_build/eval/tutorials/multimodal/object_detection/finetune/AutogluonModels/ag-20230222_231951
    `

Enjoy your coffee, and let AutoMM do the job ☕☕☕ Learn more at https://auto.gluon.ai

GPU available: True (cuda), used: True
TPU available: False, using: 0 TPU cores
IPU available: False, using: 0 IPUs
HPU available: False, using: 0 HPUs
Trainer(val_check_interval=1.0) was configured so validation will run at the end of the training epoch..
LOCAL_RANK: 0 - CUDA_VISIBLE_DEVICES: [0]

  | Name              | Type                             | Params
-----------------------------------------------------------------------
0 | model             | MMDetAutoModelForObjectDetection | 8.9 M
1 | validation_metric | MeanAveragePrecision             | 0
-----------------------------------------------------------------------
8.9 M     Trainable params
0         Non-trainable params
8.9 M     Total params
35.751    Total estimated model params size (MB)
/home/ci/opt/venv/lib/python3.8/site-packages/torch/functional.py:504: UserWarning: torch.meshgrid: in an upcoming release, it will be required to pass the indexing argument. (Triggered internally at ../aten/src/ATen/native/TensorShape.cpp:3190.)
  return _VF.meshgrid(tensors, **kwargs)  # type: ignore[attr-defined]
Epoch 2, global step 12: 'val_map' reached 0.33638 (best 0.33638), saving model to '/home/ci/autogluon/docs/_build/eval/tutorials/multimodal/object_detection/finetune/AutogluonModels/ag-20230222_231951/epoch=2-step=12.ckpt' as top 1
Epoch 5, global step 24: 'val_map' reached 0.38034 (best 0.38034), saving model to '/home/ci/autogluon/docs/_build/eval/tutorials/multimodal/object_detection/finetune/AutogluonModels/ag-20230222_231951/epoch=5-step=24.ckpt' as top 1
Epoch 8, global step 36: 'val_map' reached 0.41387 (best 0.41387), saving model to '/home/ci/autogluon/docs/_build/eval/tutorials/multimodal/object_detection/finetune/AutogluonModels/ag-20230222_231951/epoch=8-step=36.ckpt' as top 1
Epoch 11, global step 48: 'val_map' reached 0.43687 (best 0.43687), saving model to '/home/ci/autogluon/docs/_build/eval/tutorials/multimodal/object_detection/finetune/AutogluonModels/ag-20230222_231951/epoch=11-step=48.ckpt' as top 1
Epoch 14, global step 60: 'val_map' was not in top 1
Epoch 17, global step 72: 'val_map' reached 0.44254 (best 0.44254), saving model to '/home/ci/autogluon/docs/_build/eval/tutorials/multimodal/object_detection/finetune/AutogluonModels/ag-20230222_231951/epoch=17-step=72.ckpt' as top 1
Epoch 20, global step 84: 'val_map' was not in top 1
Epoch 23, global step 96: 'val_map' was not in top 1
Epoch 26, global step 108: 'val_map' was not in top 1
AutoMM has created your model 🎉🎉🎉

- To load the model, use the code below:
    `python
    from autogluon.multimodal import MultiModalPredictor
    predictor = MultiModalPredictor.load("/home/ci/autogluon/docs/_build/eval/tutorials/multimodal/object_detection/finetune/AutogluonModels/ag-20230222_231951")
    `

- You can open a terminal and launch Tensorboard to visualize the training log:
    `shell
    # Assume you have installed tensorboard
    tensorboard --logdir /home/ci/autogluon/docs/_build/eval/tutorials/multimodal/object_detection/finetune/AutogluonModels/ag-20230222_231951
    `

- If you are not satisfied with the model, try to increase the training time,
adjust the hyperparameters (https://auto.gluon.ai/stable/tutorials/multimodal/advanced_topics/customization.html),
or post issues on GitHub: https://github.com/autogluon/autogluon
Print out the time and we can see that it’s fast!
print("This finetuning takes %.2f seconds." % (end - start))
This finetuning takes 467.42 seconds.
To evaluate the model we just trained, run:
predictor.evaluate(test_path)
Using default root folder: ./pothole/pothole/Annotations/... Specify root=... if you feel it is wrong...
loading annotations into memory...
Done (t=0.00s)
creating index...
index created!
A new predictor save path is created.This is to prevent you to overwrite previous predictor saved here.You could check current save path at predictor._save_path.If you still want to use this path, set resume=True
No path specified. Models will be saved in: "AutogluonModels/ag-20230222_232741/"
saving file at /home/ci/autogluon/docs/_build/eval/tutorials/multimodal/object_detection/finetune/AutogluonModels/ag-20230222_232741/object_detection_result_cache.json
loading annotations into memory...
Done (t=0.00s)
creating index...
index created!
Loading and preparing results...
DONE (t=0.01s)
creating index...
index created!
Running per image evaluation...
Evaluate annotation type bbox
DONE (t=0.11s).
Accumulating evaluation results...
DONE (t=0.03s).
 Average Precision  (AP) @[ IoU=0.50:0.95 | area=   all | maxDets=100 ] = 0.436
 Average Precision  (AP) @[ IoU=0.50      | area=   all | maxDets=100 ] = 0.757
 Average Precision  (AP) @[ IoU=0.75      | area=   all | maxDets=100 ] = 0.440
 Average Precision  (AP) @[ IoU=0.50:0.95 | area= small | maxDets=100 ] = 0.263
 Average Precision  (AP) @[ IoU=0.50:0.95 | area=medium | maxDets=100 ] = 0.436
 Average Precision  (AP) @[ IoU=0.50:0.95 | area= large | maxDets=100 ] = 0.583
 Average Recall     (AR) @[ IoU=0.50:0.95 | area=   all | maxDets=  1 ] = 0.240
 Average Recall     (AR) @[ IoU=0.50:0.95 | area=   all | maxDets= 10 ] = 0.525
 Average Recall     (AR) @[ IoU=0.50:0.95 | area=   all | maxDets=100 ] = 0.564
 Average Recall     (AR) @[ IoU=0.50:0.95 | area= small | maxDets=100 ] = 0.448
 Average Recall     (AR) @[ IoU=0.50:0.95 | area=medium | maxDets=100 ] = 0.554
 Average Recall     (AR) @[ IoU=0.50:0.95 | area= large | maxDets=100 ] = 0.679
{'map': 0.43609935993122534,
 'mean_average_precision': 0.43609935993122534,
 'map_50': 0.7574930278610449,
 'map_75': 0.43965945529873496,
 'map_small': 0.26277370400296163,
 'map_medium': 0.4360258375917728,
 'map_large': 0.5834484212963668,
 'mar_1': 0.2395280235988201,
 'mar_10': 0.5250737463126843,
 'mar_100': 0.5637168141592921,
 'mar_small': 0.447887323943662,
 'mar_medium': 0.5535911602209944,
 'mar_large': 0.6793103448275862}
Note that you can also use our predefined presets "medium_quality"
to do the exact same thing with following code script:
predictor = MultiModalPredictor(
    problem_type="object_detection",
    sample_data_path=train_path,
    presets="medium_quality",
)
predictor.fit(train_path, tuning_data=val_path)
predictor.evaluate(test_path)
For more about using presets, see AutoMM Detection - Quick Start on a Tiny COCO Format Dataset.
And the evaluation results are shown in command line output. The first value is mAP in COCO standard, and the second one is mAP in VOC standard (or mAP50). For more details about these metrics, see COCO’s evaluation guideline.
We can get the prediction on test set:
pred = predictor.predict(test_path)
Using default root folder: ./pothole/pothole/Annotations/... Specify root=... if you feel it is wrong...
loading annotations into memory...
Done (t=0.00s)
creating index...
index created!
Let’s also visualize the prediction result:
!pip install opencv-python
Requirement already satisfied: opencv-python in /home/ci/opt/venv/lib/python3.8/site-packages (4.7.0.72)
Requirement already satisfied: numpy>=1.17.3 in /home/ci/opt/venv/lib/python3.8/site-packages (from opencv-python) (1.23.5)
from autogluon.multimodal.utils import visualize_detection
conf_threshold = 0.25  # Specify a confidence threshold to filter out unwanted boxes
visualization_result_dir = "./"  # Use the pwd as result dir to save the visualized image
visualized = visualize_detection(
    pred=pred[12:13],
    detection_classes=predictor.get_predictor_classes(),
    conf_threshold=conf_threshold,
    visualization_result_dir=visualization_result_dir,
)
from PIL import Image
from IPython.display import display
img = Image.fromarray(visualized[0][:, :, ::-1], 'RGB')
display(img)
Saved visualizations to ./
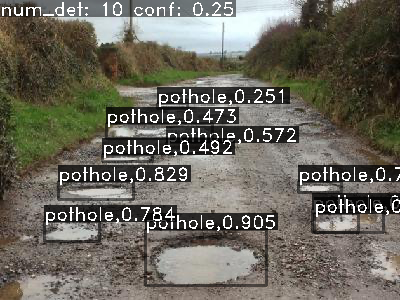
Under this fast finetune setting, we reached a good mAP number on a new
dataset with a few hundred seconds! For how to finetune with higher
performance, see AutoMM Detection - High Performance Finetune on COCO Format Dataset, where we
finetuned a VFNet model with 5 hours and reached
mAP = 0.450, mAP50 = 0.718 on this dataset.
Other Examples
You may go to AutoMM Examples to explore other examples about AutoMM.
Customization
To learn how to customize AutoMM, please refer to Customize AutoMM.
Citation
@article{DBLP:journals/corr/abs-2107-08430,
  author    = {Zheng Ge and
               Songtao Liu and
               Feng Wang and
               Zeming Li and
               Jian Sun},
  title     = {{YOLOX:} Exceeding {YOLO} Series in 2021},
  journal   = {CoRR},
  volume    = {abs/2107.08430},
  year      = {2021},
  url       = {https://arxiv.org/abs/2107.08430},
  eprinttype = {arXiv},
  eprint    = {2107.08430},
  timestamp = {Tue, 05 Apr 2022 14:09:44 +0200},
  biburl    = {https://dblp.org/rec/journals/corr/abs-2107-08430.bib},
  bibsource = {dblp computer science bibliography, https://dblp.org},
}