
Categorizing Scanned Documents with AutoMM
Paper documents in an organization are a crucial source of information, regardless of industry. Dealing with paper documents is a headache because they can occupy a significant amount of space, can easily wear or fade with time, and are difficult to keep track of. As such, there is a growing trend to digitizing paper documents via scanners, cameras, etc. However, digitization does not necessarily bring automation, and identifying, categorizing, and analyzing digital documents can still be a labor-intensive process. For example, classifying digital books into different genres, and categorizing scanned receipts into utilities, transportation, insurance, rent, supplies, etc. are time-consuming and tiresome if done manually. With newer AI technologies, automating digital document processing becomes easier and more effective. It’s fair to say that AI has been the bedrock of modern digital document processing systems.
In this tutorial, we show how you can build a scanned document classifier with Autogluon Multimodal using a few lines of code. Let’s get started!
Get a Document Dataset
Now let’s download a scanned document dataset. This dataset is a sample of RVL-CDIP which originally consists of 400,000 grayscale images in 16 classes, with 25,000 images per class. Here, we sampled around 100 documents and three categories of document including budget (labelled as 0), email (labelled as 1), and form (labelled as 2).
import os
import pandas as pd
from autogluon.core.utils.loaders import load_zip

download_dir = './ag_automm_tutorial_doc_classifier'
zip_file = "https://automl-mm-bench.s3.amazonaws.com/doc_classification/rvl_cdip_sample.zip"
load_zip.unzip(zip_file, unzip_dir=download_dir)
Downloading ./ag_automm_tutorial_doc_classifier/file.zip from https://automl-mm-bench.s3.amazonaws.com/doc_classification/rvl_cdip_sample.zip...
100%|██████████| 7.95M/7.95M [00:00<00:00, 97.3MiB/s]
We load the training and test data below.
dataset_path = os.path.join(download_dir, "rvl_cdip_sample")
rvl_cdip_data = pd.read_csv(f"{dataset_path}/rvl_cdip_train_data.csv")
train_data = rvl_cdip_data.sample(frac=0.8, random_state=200)
test_data = rvl_cdip_data.drop(train_data.index)
We need to expand the document paths to load them in training.
from autogluon.multimodal.utils.misc import path_expander

DOC_PATH_COL = "doc_path"

train_data[DOC_PATH_COL] = train_data[DOC_PATH_COL].apply(lambda ele: path_expander(ele, base_folder=download_dir))
test_data[DOC_PATH_COL] = test_data[DOC_PATH_COL].apply(lambda ele: path_expander(ele, base_folder=download_dir))
print(test_data.head())
The cache for model files in Transformers v4.22.0 has been updated. Migrating your old cache. This is a one-time only operation. You can interrupt this and resume the migration later on by calling transformers.utils.move_cache().
Moving 0 files to the new cache system
0it [00:00, ?it/s]
                                             doc_path  label
1   /home/ci/autogluon/docs/_build/eval/tutorials/...      0
6   /home/ci/autogluon/docs/_build/eval/tutorials/...      0
7   /home/ci/autogluon/docs/_build/eval/tutorials/...      0
11  /home/ci/autogluon/docs/_build/eval/tutorials/...      0
14  /home/ci/autogluon/docs/_build/eval/tutorials/...      0
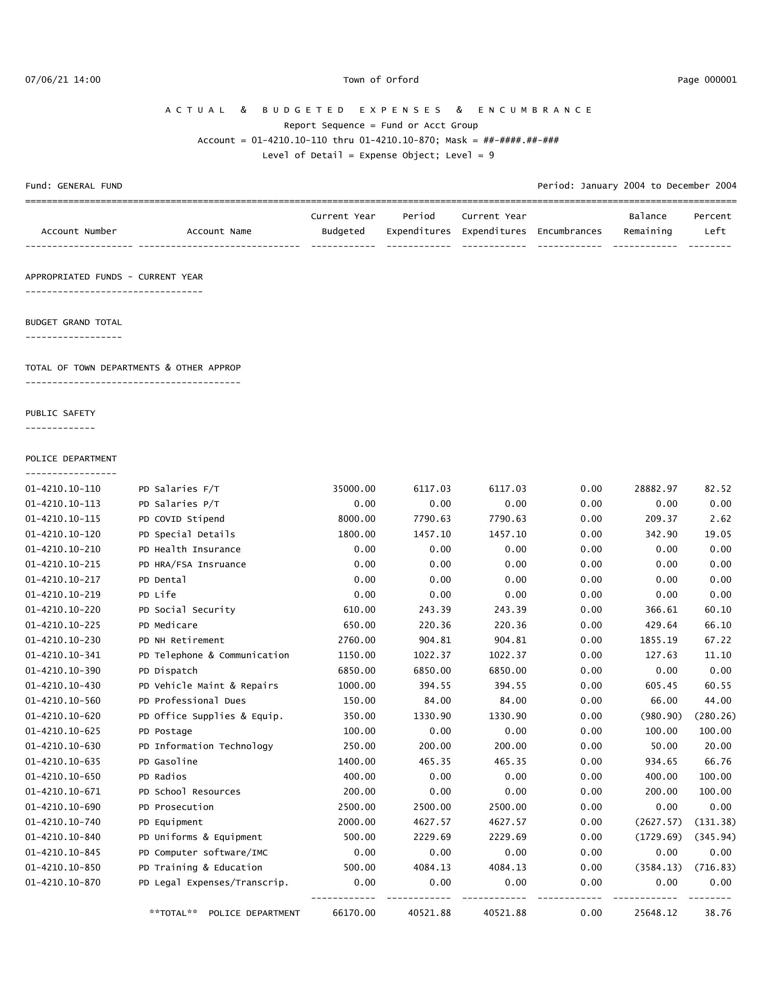
Let’s display one of the document. As you can see, this is a budget document consisting of account number, account name, budgeted fund, expenditures, and etc.
from IPython.display import Image, display

example_image = train_data.iloc[0][DOC_PATH_COL]
pil_img = Image(filename=example_image, width=500)
display(pil_img)
Build a Scanned Document Classifier with AutoMM
You can build a scanned document classifier with our
MultiModalPredictor. All you need to do is to create a predictor and fit
it with the above training dataset. Under the hood, AutoMM will
automatically recognize handwritten or typed text, and make use of the
recognized text, layout information, as well as the visual features for
document classification. Model customization is also quite simple, you
can specify the underline foundation model using the
model.document_transformer.checkpoint_name hyperparameter and AutoMM
support document foundation models such as
layoutlmv3,
layoutlmv2,
layoutlm-base,
layoutxlm,
etc., as well as pure text models like
bert,
deberta, just to
name a few.
Here, label is the name of the column that contains the target
variable to predict, e.g., it is “label” in our example. We set the
training time limit to 120 seconds for demonstration purposes.
from autogluon.multimodal import MultiModalPredictor

predictor = MultiModalPredictor(label="label")
predictor.fit(
    train_data=train_data,
    hyperparameters={"model.document_transformer.checkpoint_name":"microsoft/layoutlm-base-uncased"},
    time_limit=120,
)
/home/ci/opt/venv/lib/python3.8/site-packages/torch/functional.py:504: UserWarning: torch.meshgrid: in an upcoming release, it will be required to pass the indexing argument. (Triggered internally at ../aten/src/ATen/native/TensorShape.cpp:3190.)
  return _VF.meshgrid(tensors, **kwargs)  # type: ignore[attr-defined]
Downloading: "https://github.com/SwinTransformer/storage/releases/download/v1.0.0/swin_base_patch4_window7_224_22kto1k.pth" to /home/ci/.cache/torch/hub/checkpoints/swin_base_patch4_window7_224_22kto1k.pth
/home/ci/opt/venv/lib/python3.8/site-packages/pytorch_lightning/trainer/trainer.py:1595: PossibleUserWarning: The number of training batches (8) is smaller than the logging interval Trainer(log_every_n_steps=10). Set a lower value for log_every_n_steps if you want to see logs for the training epoch.
  rank_zero_warn(
/home/ci/opt/venv/lib/python3.8/site-packages/pytorch_lightning/utilities/cloud_io.py:33: LightningDeprecationWarning: pytorch_lightning.utilities.cloud_io.get_filesystem has been deprecated in v1.8.0 and will be removed in v1.10.0. Please use lightning_lite.utilities.cloud_io.get_filesystem instead.
  rank_zero_deprecation(
/home/ci/opt/venv/lib/python3.8/site-packages/pytorch_lightning/utilities/cloud_io.py:25: LightningDeprecationWarning: pytorch_lightning.utilities.cloud_io.atomic_save has been deprecated in v1.8.0 and will be removed in v1.10.0. This function is internal but you can copy over its implementation.
  rank_zero_deprecation(
Exception ignored in: <function _ConnectionBase.__del__ at 0x7fb74837e8b0>
Traceback (most recent call last):
  File "/opt/conda/lib/python3.8/multiprocessing/connection.py", line 132, in __del__
    self._close()
  File "/opt/conda/lib/python3.8/multiprocessing/connection.py", line 361, in _close
    _close(self._handle)
OSError: [Errno 9] Bad file descriptor
<autogluon.multimodal.predictor.MultiModalPredictor at 0x7fb754405250>
Evaluate on Test Dataset
You can evaluate the classifier on the test dataset to see how it performs:
scores = predictor.evaluate(test_data, metrics=["accuracy"])
print('The test acc: %.3f' % scores["accuracy"])
The test acc: 0.900
Predict on a New Document
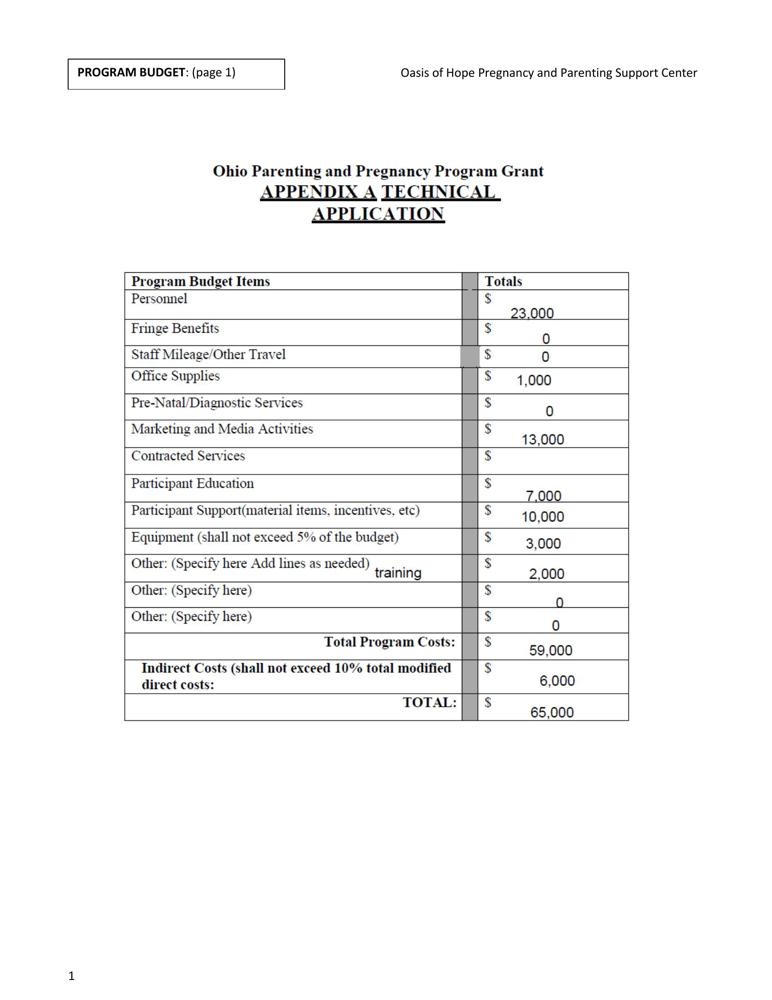
Given an example document, let’s visualize it first,
doc_path = test_data.iloc[1][DOC_PATH_COL]
from IPython.display import Image, display
pil_img = Image(filename=doc_path, width=500)
display(pil_img)
We can easily use the final model to predict the label,
predictions = predictor.predict({DOC_PATH_COL: [doc_path]})
print(predictions)
[0]
The above output shows that the trained model correctly classifies the given document into the budget category.
If probabilities of all categories are needed, you can call predict_proba:
proba = predictor.predict_proba({DOC_PATH_COL: [doc_path]})
print(proba)
[[0.6916792 0.26895446 0.03936633]]
Extract Embeddings
Extracting representation from the whole document learned by a model is also very useful. We provide extract_embedding function to allow predictor to return the N-dimensional document feature where N depends on the model.
feature = predictor.extract_embedding({DOC_PATH_COL: [doc_path]})
print(feature[0].shape)
(1024,)
Other Examples
You may go to AutoMM Examples to explore other examples about AutoMM.
Customization
To learn how to customize AutoMM, please refer to Customize AutoMM.