
Object Detection - Prepare Dataset for Object Detector
Preparing dataset for object detection is slightly difference and more difficult than image prediction.
Our goal in this tutorial is to introduce the simplest methods to
initiate or load a object detection datset for
autogluon.vision.ObjectDetector.
There are generally two ways to load a dataset for ObjectDetector:
Load an existing object detection dataset, in VOC or COCO formats, downloaded or exported by other labeling tools.
Manually convert raw annotations in any format, knowing this you will be able to deal with arbitrary dataset format.
%matplotlib inline
import autogluon.core as ag
from autogluon.vision import ObjectDetector
Load an existing object detection dataset
Pascal VOC and MS COCO are two most popular data format for object detection. Most public available object detection datasets follow either one of these two formats. In this tutorial we will not touch the details. You may view the original introduction for VOC and COCO.
To distinguish these two formats, you can either refer to the labeling
tool or check the folder structure. Usually annotations in VOC format
are individual xml files, while COCO format use a single json
file to store all annotations.
url = 'https://autogluon.s3.amazonaws.com/datasets/tiny_motorbike.zip'
dataset_train = ObjectDetector.Dataset.from_voc(url, splits='trainval')
# or load from coco format, skip as it's too big to download
# dataset_train = ObjectDetector.Dataset.from_coco(annotation_json_file, root='/path/to/root')
tiny_motorbike/
├── Annotations/
├── ImageSets/
└── JPEGImages/
Manually convert any format to autogluon object detector dataset
We will walk you through by creating a dataset manually to help you understand the meaning of underlying data, this does not mean you have to do so. We highly recommend you to use a handy labeling tool for object detection if you want to create one by your own. Labeling bounding boxes are time consuming so a nice UI/UX design will significantly reduce the trouble.
In the following section, we will use a single image and add annotations manually for all three major objects.
ag.utils.download('https://raw.githubusercontent.com/zhreshold/mxnet-ssd/master/data/demo/dog.jpg', path='dog.jpg')
import matplotlib.image as mpimg
import matplotlib.pyplot as plt
img = mpimg.imread('dog.jpg')
imgplot = plt.imshow(img)
plt.grid()
plt.show()
INFO:autogluon.core.utils.files:Downloading dog.jpg from https://raw.githubusercontent.com/zhreshold/mxnet-ssd/master/data/demo/dog.jpg...
100%|██████████| 160/160 [00:00<00:00, 7121.44KB/s]
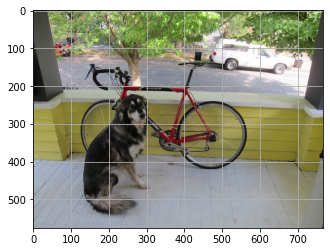
With the grid on, we can roughly annotate this image like this:
import pandas as pd
class NaiveDetectionGT:
def __init__(self, image):
self._objects = []
self.image = image
img = mpimg.imread('dog.jpg')
self.w = img.shape[1]
self.h = img.shape[0]
def add_object(self, name, xmin, ymin, xmax, ymax, difficult=0):
self._objects.append({'image': self.image, 'class': name,
'xmin': xmin / self.w, 'ymin': ymin / self.h,
'xmax': xmax / self.w, 'ymax': ymax / self.h, 'difficult': difficult})
@property
def df(self):
return pd.DataFrame(self._objects)
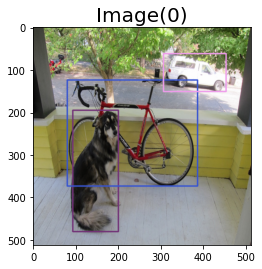
gt = NaiveDetectionGT('dog.jpg')
gt.add_object('dog', 140, 220, 300, 540)
gt.add_object('bicycle', 120, 140, 580, 420)
gt.add_object('car', 460, 70, 680, 170)
df = gt.df
df
| image | class | xmin | ymin | xmax | ymax | difficult | |
|---|---|---|---|---|---|---|---|
| 0 | dog.jpg | dog | 0.182292 | 0.381944 | 0.390625 | 0.937500 | 0 |
| 1 | dog.jpg | bicycle | 0.156250 | 0.243056 | 0.755208 | 0.729167 | 0 |
| 2 | dog.jpg | car | 0.598958 | 0.121528 | 0.885417 | 0.295139 | 0 |
The df is a valid dataset and can be used by ObjectDetector.fit
function. Internally it will be converted to object detection dataset,
or you can manually convert it.
dataset = ObjectDetector.Dataset(df, classes=df['class'].unique().tolist())
dataset.show_images(nsample=1, ncol=1)
Congratulations, you can now proceed to
Object Detection - Quick Start to start training the
ObjectDetector.