AutoMM for Semantic Segmentation - Quick Start
![]()

Semantic Segmentation is a computer vision task where the objective is to create a detailed pixel-wise segmentation map of an image, assigning each pixel to a specific class or object. This technology is crucial in various applications, such as in autonomous vehicles to identify vehicles, pedestrians, traffic signs, pavement, and other road features.
The Segment Anything Model (SAM) is a foundational model pretrained on a vast dataset with 1 billion masks and 11 million images. While SAM performs exceptionally well on generic scenes, it encounters challenges when applied to specialized domains like remote sensing, medical imagery, agriculture, and manufacturing. Fortunately, AutoMM comes to the rescue by facilitating the fine-tuning of SAM on domain-specific data.
In this easy-to-follow tutorial, we will guide you through the process of using AutoMM to fine-tune SAM. With just a single call to the fit() API, you can effortlessly train the model.
Prepare Data
For demonstration purposes, we use the Leaf Disease Segmentation from Kaggle. This dataset is a good example for automating disease detection in plants, especially for speeding up the plant pathology process. Segmenting specific regions on leaves or plants can be quite challenging, particularly when dealing with smaller diseased areas or various types of diseases.
To begin, download and prepare the dataset.
download_dir = './ag_automm_tutorial'
zip_file = 'https://automl-mm-bench.s3.amazonaws.com/semantic_segmentation/leaf_disease_segmentation.zip'
from autogluon.core.utils.loaders import load_zip
load_zip.unzip(zip_file, unzip_dir=download_dir)
Downloading ./ag_automm_tutorial/file.zip from https://automl-mm-bench.s3.amazonaws.com/semantic_segmentation/leaf_disease_segmentation.zip...
0%|          | 0.00/53.3M [00:00<?, ?iB/s]
12%|█▏        | 6.61M/53.3M [00:00<00:00, 63.4MiB/s]
24%|██▍       | 12.9M/53.3M [00:00<00:00, 53.2MiB/s]
43%|████▎     | 23.0M/53.3M [00:00<00:00, 72.7MiB/s]
57%|█████▋    | 30.6M/53.3M [00:00<00:00, 68.0MiB/s]
70%|███████   | 37.6M/53.3M [00:00<00:00, 36.2MiB/s]
83%|████████▎ | 44.3M/53.3M [00:00<00:00, 42.4MiB/s]
97%|█████████▋| 51.5M/53.3M [00:01<00:00, 48.9MiB/s]
100%|██████████| 53.3M/53.3M [00:01<00:00, 48.4MiB/s]
Next, load the CSV files, ensuring that relative paths are expanded to facilitate correct data loading during both training and testing.
import pandas as pd
import os
dataset_path = os.path.join(download_dir, 'leaf_disease_segmentation')
train_data = pd.read_csv(f'{dataset_path}/train.csv', index_col=0)
val_data = pd.read_csv(f'{dataset_path}/val.csv', index_col=0)
test_data = pd.read_csv(f'{dataset_path}/test.csv', index_col=0)
image_col = 'image'
label_col = 'label'
def path_expander(path, base_folder):
    path_l = path.split(';')
    return ';'.join([os.path.abspath(os.path.join(base_folder, path)) for path in path_l])

for per_col in [image_col, label_col]:
    train_data[per_col] = train_data[per_col].apply(lambda ele: path_expander(ele, base_folder=dataset_path))
    val_data[per_col] = val_data[per_col].apply(lambda ele: path_expander(ele, base_folder=dataset_path))
    test_data[per_col] = test_data[per_col].apply(lambda ele: path_expander(ele, base_folder=dataset_path))


print(train_data[image_col].iloc[0])
print(train_data[label_col].iloc[0])
/home/ci/autogluon/docs/tutorials/multimodal/image_segmentation/ag_automm_tutorial/leaf_disease_segmentation/train_images/00002.jpg
/home/ci/autogluon/docs/tutorials/multimodal/image_segmentation/ag_automm_tutorial/leaf_disease_segmentation/train_masks/00002.png
Each Pandas DataFrame contains two columns: one for image paths and the other for corresponding groundtruth masks. Let’s take a closer look at the training data DataFrame.
train_data.head()
| image | label | |
|---|---|---|
| 0 | /home/ci/autogluon/docs/tutorials/multimodal/i... | /home/ci/autogluon/docs/tutorials/multimodal/i... |
| 1 | /home/ci/autogluon/docs/tutorials/multimodal/i... | /home/ci/autogluon/docs/tutorials/multimodal/i... |
| 2 | /home/ci/autogluon/docs/tutorials/multimodal/i... | /home/ci/autogluon/docs/tutorials/multimodal/i... |
| 3 | /home/ci/autogluon/docs/tutorials/multimodal/i... | /home/ci/autogluon/docs/tutorials/multimodal/i... |
| 4 | /home/ci/autogluon/docs/tutorials/multimodal/i... | /home/ci/autogluon/docs/tutorials/multimodal/i... |
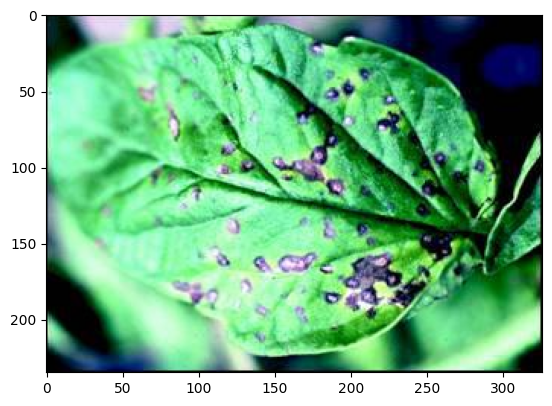
We can also visualize one image and its groundtruth mask.
from autogluon.multimodal.utils import SemanticSegmentationVisualizer
visualizer = SemanticSegmentationVisualizer()
visualizer.plot_image(test_data.iloc[0]['image'])
/home/ci/opt/venv/lib/python3.11/site-packages/mmengine/optim/optimizer/zero_optimizer.py:11: DeprecationWarning: `TorchScript` support for functional optimizers is deprecated and will be removed in a future PyTorch release. Consider using the `torch.compile` optimizer instead.
  from torch.distributed.optim import \
visualizer.plot_image(test_data.iloc[0]['label'])

Zero Shot Evaluation
Now, let’s see how well the pretrained SAM can segment the images. For this demonstration, we’ll use the base SAM model.
from autogluon.multimodal import MultiModalPredictor
predictor_zero_shot = MultiModalPredictor(
    problem_type="semantic_segmentation",
    label=label_col,
     hyperparameters={
            "model.sam.checkpoint_name": "facebook/sam-vit-base",
        },
    num_classes=1, # forground-background segmentation
)
After initializing the predictor, you can perform inference directly.
pred_zero_shot = predictor_zero_shot.predict({'image': [test_data.iloc[0]['image']]})
visualizer.plot_mask(pred_zero_shot)
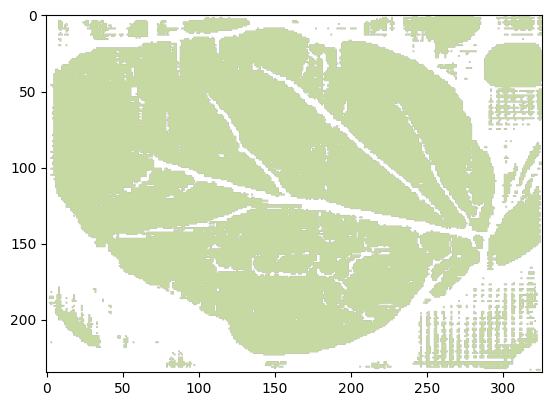
It’s worth noting that SAM without prompts outputs a rough leaf mask instead of disease masks due to its lack of context about the domain task. While SAM can perform better with proper click prompts, it might not be an ideal end-to-end solution for some applications that require a standalone model for deployment.
You can also conduct a zero-shot evaluation on the test data.
scores = predictor_zero_shot.evaluate(test_data, metrics=["iou"])
print(scores)
{'iou': 0.1398000568151474}
As expected, the test score of the zero-shot SAM is relatively low. Next, let’s explore how to fine-tune SAM for enhanced performance.
Finetune SAM
Initialize a new predictor and fit it with the training and validation data.
from autogluon.multimodal import MultiModalPredictor
import uuid
save_path = f"./tmp/{uuid.uuid4().hex}-automm_semantic_seg"
predictor = MultiModalPredictor(
    problem_type="semantic_segmentation",
    label="label",
     hyperparameters={
            "model.sam.checkpoint_name": "facebook/sam-vit-base",
        },
    path=save_path,
)
predictor.fit(
    train_data=train_data,
    tuning_data=val_data,
    time_limit=180, # seconds
)
=================== System Info ===================
AutoGluon Version:  1.2b20250107
Python Version:     3.11.9
Operating System:   Linux
Platform Machine:   x86_64
Platform Version:   #1 SMP Tue Sep 24 10:00:37 UTC 2024
CPU Count:          8
Pytorch Version:    2.5.1+cu124
CUDA Version:       12.4
Memory Avail:       26.76 GB / 30.95 GB (86.5%)
Disk Space Avail:   187.67 GB / 255.99 GB (73.3%)
===================================================
AutoMM starts to create your model. ✨✨✨

To track the learning progress, you can open a terminal and launch Tensorboard:
    ```shell
    # Assume you have installed tensorboard
    tensorboard --logdir /home/ci/autogluon/docs/tutorials/multimodal/image_segmentation/tmp/d801141e061945b3a41ca8594a40c406-automm_semantic_seg
    ```
INFO: Seed set to 0
GPU Count: 1
GPU Count to be Used: 1
GPU 0 Name: Tesla T4
GPU 0 Memory: 0.56GB/15.0GB (Used/Total)
INFO: Using 16bit Automatic Mixed Precision (AMP)
INFO: GPU available: True (cuda), used: True
INFO: TPU available: False, using: 0 TPU cores
INFO: HPU available: False, using: 0 HPUs
INFO: `Trainer(val_check_interval=1.0)` was configured so validation will run at the end of the training epoch..
INFO: LOCAL_RANK: 0 - CUDA_VISIBLE_DEVICES: [0]
INFO:
  | Name              | Type                       | Params | Mode
-------------------------------------------------------------------------
0 | model             | SAMForSemanticSegmentation | 93.4 M | train
1 | validation_metric | Binary_IoU                 | 0      | train
2 | loss_func         | StructureLoss              | 0      | train
-------------------------------------------------------------------------
3.6 M     Trainable params
89.8 M    Non-trainable params
93.4 M    Total params
373.703   Total estimated model params size (MB)
17        Modules in train mode
208       Modules in eval mode
/home/ci/opt/venv/lib/python3.11/site-packages/torch/nn/_reduction.py:51: UserWarning: size_average and reduce args will be deprecated, please use reduction='mean' instead.
  warnings.warn(warning.format(ret))
INFO: Time limit reached. Elapsed time is 0:03:00. Signaling Trainer to stop.
INFO: Epoch 0, global step 96: 'val_iou' reached 0.57584 (best 0.57584), saving model to '/home/ci/autogluon/docs/tutorials/multimodal/image_segmentation/tmp/d801141e061945b3a41ca8594a40c406-automm_semantic_seg/epoch=0-step=96.ckpt' as top 3
/home/ci/autogluon/multimodal/src/autogluon/multimodal/utils/checkpoint.py:63: FutureWarning: You are using `torch.load` with `weights_only=False` (the current default value), which uses the default pickle module implicitly. It is possible to construct malicious pickle data which will execute arbitrary code during unpickling (See https://github.com/pytorch/pytorch/blob/main/SECURITY.md#untrusted-models for more details). In a future release, the default value for `weights_only` will be flipped to `True`. This limits the functions that could be executed during unpickling. Arbitrary objects will no longer be allowed to be loaded via this mode unless they are explicitly allowlisted by the user via `torch.serialization.add_safe_globals`. We recommend you start setting `weights_only=True` for any use case where you don't have full control of the loaded file. Please open an issue on GitHub for any issues related to this experimental feature.
  avg_state_dict = torch.load(checkpoint_paths[0], map_location=torch.device("cpu"))["state_dict"]  # nosec B614
AutoMM has created your model. 🎉🎉🎉

To load the model, use the code below:
    ```python
    from autogluon.multimodal import MultiModalPredictor
    predictor = MultiModalPredictor.load("/home/ci/autogluon/docs/tutorials/multimodal/image_segmentation/tmp/d801141e061945b3a41ca8594a40c406-automm_semantic_seg")
    ```

If you are not satisfied with the model, try to increase the training time,
adjust the hyperparameters (https://auto.gluon.ai/stable/tutorials/multimodal/advanced_topics/customization.html),
or post issues on GitHub (https://github.com/autogluon/autogluon/issues).
<autogluon.multimodal.predictor.MultiModalPredictor at 0x7ff0ac7b0210>
Under the hood, we use LoRA for efficient fine-tuning. Note that, without hyperparameter customization, the huge SAM serves as the default model, which requires efficient fine-tuning in many cases.
After fine-tuning, evaluate SAM on the test data.
scores = predictor.evaluate(test_data, metrics=["iou"])
print(scores)
{'iou': 0.5886080265045166}
Thanks to the fine-tuning process, the test score has significantly improved.
To visualize the impact, let’s examine the predicted mask after fine-tuning.
pred = predictor.predict({'image': [test_data.iloc[0]['image']]})
visualizer.plot_mask(pred)
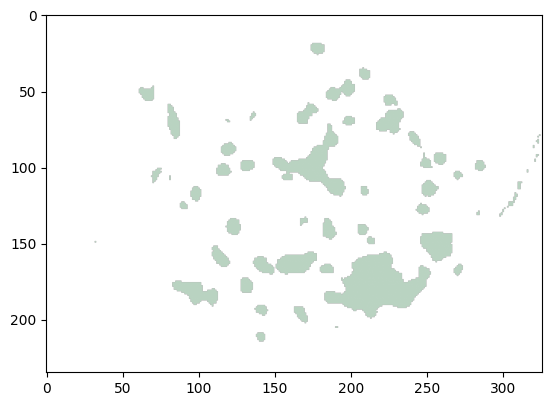
As evident from the results, the predicted mask is now much closer to the groundtruth. This demonstrates the effectiveness of using AutoMM to fine-tune SAM for domain-specific applications, enhancing its performance in tasks like leaf disease segmentation.
Save and Load
The trained predictor is automatically saved at the end of fit(), and you can easily reload it.
Warning
MultiModalPredictor.load() uses pickle module implicitly, which is known to be insecure. It is possible to construct malicious pickle data which will execute arbitrary code during unpickling. Never load data that could have come from an untrusted source, or that could have been tampered with. Only load data you trust.
loaded_predictor = MultiModalPredictor.load(save_path)
scores = loaded_predictor.evaluate(test_data, metrics=["iou"])
print(scores)
Load pretrained checkpoint: /home/ci/autogluon/docs/tutorials/multimodal/image_segmentation/tmp/d801141e061945b3a41ca8594a40c406-automm_semantic_seg/model.ckpt
/home/ci/autogluon/multimodal/src/autogluon/multimodal/learners/base.py:2117: FutureWarning: You are using `torch.load` with `weights_only=False` (the current default value), which uses the default pickle module implicitly. It is possible to construct malicious pickle data which will execute arbitrary code during unpickling (See https://github.com/pytorch/pytorch/blob/main/SECURITY.md#untrusted-models for more details). In a future release, the default value for `weights_only` will be flipped to `True`. This limits the functions that could be executed during unpickling. Arbitrary objects will no longer be allowed to be loaded via this mode unless they are explicitly allowlisted by the user via `torch.serialization.add_safe_globals`. We recommend you start setting `weights_only=True` for any use case where you don't have full control of the loaded file. Please open an issue on GitHub for any issues related to this experimental feature.
  state_dict = torch.load(path, map_location=torch.device("cpu"))["state_dict"]  # nosec B614
{'iou': 0.5886080265045166}
We can see the evaluation score is still the same as above, which means same model!
Other Examples
You may go to AutoMM Examples to explore other examples about AutoMM.
Customization
To learn how to customize AutoMM, please refer to Customize AutoMM.